-
Last updated on September 13, 2024
-
Let me tell you what advantages images converted to WebP have for your WordPress site. If you are still hesitant to have images in WebP format, I will dispel your doubts in a minute. In this article you will learn how to convert images to WebP for free. Yes, for free! There is a WordPress WebP plugin for that - meet Converter for Media.
-
Why convert images to WebP?
Nowadays, websites are overloaded with images and media files of all kinds. The site owner wants to please the visitor but often doesn’t realize that he may actually be unwittingly contributing to the user leaving the site faster. Why? Because pages that are too rich in images and media files simply load slower. And as a result, it is not uncommon for a user to leave the site before it loads.
A possible solution to this issue is to prevent long page load times. This can be done very easily – by converting images to WebP. The weight of images converted to WebP format is on average 50% less than the original images.
Another point in favor of having images compressed into Webp format is its high percentage of browser compatibility.
Files compressed to WebP will almost certainly be supported by your site user’s browser, as this format has great support (albeit not 100%). According to caniuse.com, currently approx. 97% of browsers support the WebP image format. This is an important point, as currently not all image formats can boast such high support for browsers.
WordPress WebP plugin – how to choose the right one?
WordPress does not support automatically converting images to WebP format. This is because if this were the case, images would not be supported on a certain fraction of devices. In the present situation, this can be prevented by using a plugin to convert images to WebP. It is up to the user to decide whether the images on their WordPress site should be converted to WebP or not. All you will have to do is to use a WebP WordPress plugin that will do all the work.
The best WordPress WebP plugin should be featured with:
- Automaticity – set once and don’t harp on it for the future. The images newly added to the Media Library should ideally automatically be converted to WebP.
- No interference with the original file. This affects the site’s security. Choose a plugin that does not modify the original file – if you stop using it, you can always go back to the original files.
- Simplicity of use – let the plugin do everything for you! Ideally, all would happen with just a click of the mouse. Bet on a WebP plugin that is ready out of the box.
- Guarantee to compress images to half their size or less – this way your site will load faster.
- Versatility – It should not matter if the image displays as an img HTML tag or as a background-image.
- Last but not least – no need to spend a fortune on it. Quality services cost money, but if you can save and get a quality service of converting images to WebP at the same time, why not take advantage of it?
Converter for Media – your free WebP plugin
Converter for Media – the WebP plugin supports all the features mentioned in the previous paragraph. It was just a small spoiler of what awaits you after installing this WebP converter. Furthermore, the plugin is characterized by its user-friendly design, frequent updates and excellent technical support. Why shouldn’t you try it out? I’m telling you, that’s your WP WebP plugin.
Do you know what’s the best part? It does everything for you – just leave the default settings and enjoy WebP optimized images. Converter for Media is one of the few plugins for converting images to WebP that is available for free without any limits. Of course, the plugin comes in a premium version too, but the free one is more than enough if what you’re looking for is a WebP plugin for WordPress.
WebP convert step by step
This is what you should do to convert images to WebP with this plugin:
First, in the plugin finder box, type: converter for media. Among the search results, select the one below, install and activate it.
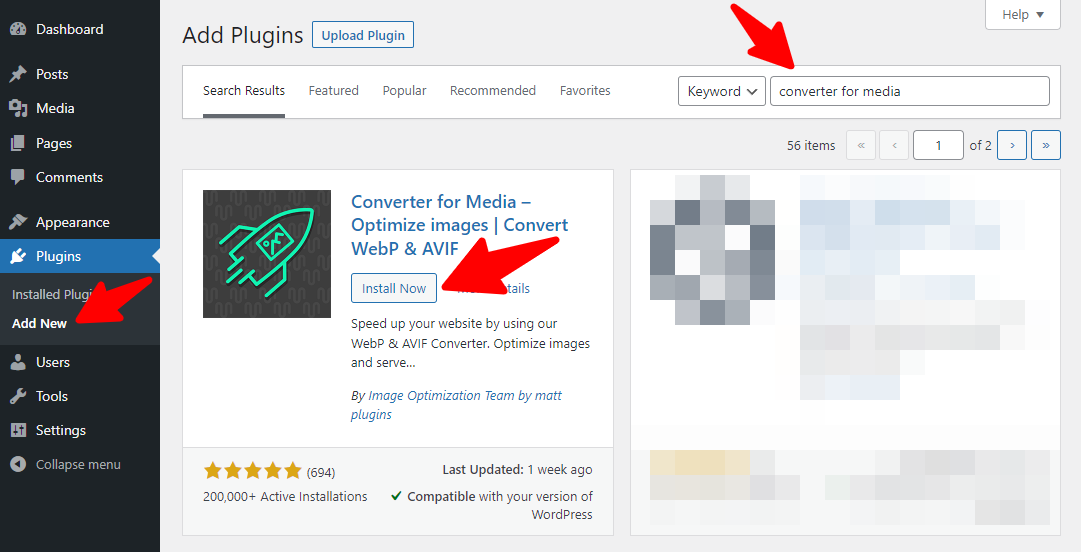
Then, go to Settings, where you can find the plugin installed in your Dashboard:
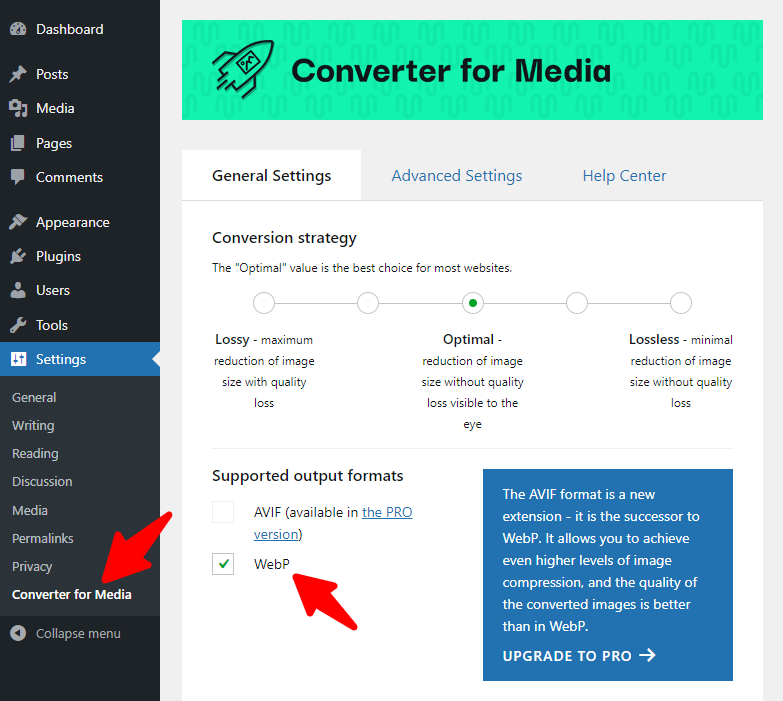
As you can see, the free version lets you convert images to WebP. However, you can get the PRO if you wish to try the AVIF format on your website.
Important note: In order to be able to convert images to WebP, you need to have GD or Imagick extension installed. The extension must support WebP format. You may have incorrectly configured the GD or Imagick libraries when the error says they aren’t installed. Read more about it in the Converter for Media FAQ.
Don’t you have such a library? Don’t worry! The alternative we can offer you is to use the Remote server option. This option is available in the PRO version of the Converter for Media plugin.
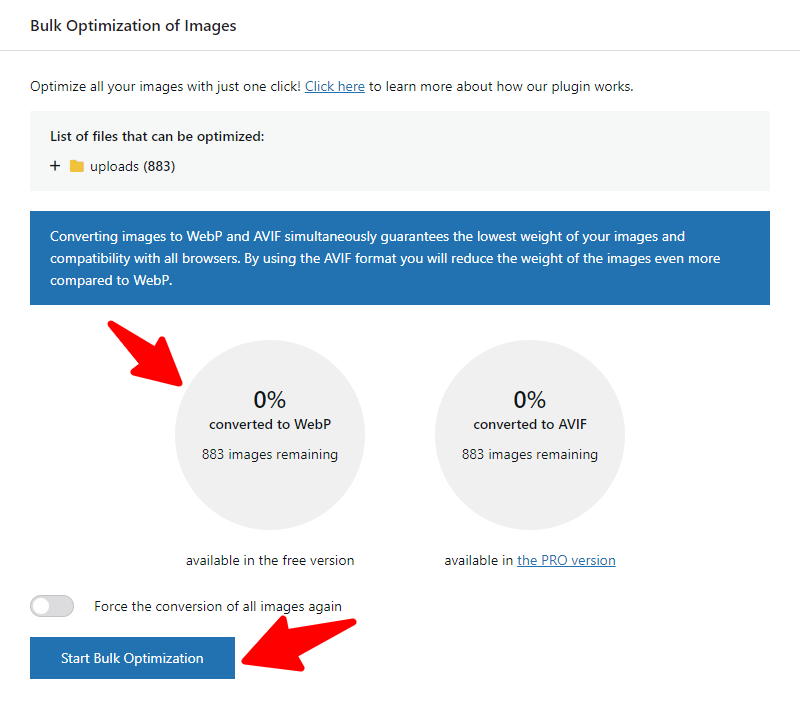
The plugin is configured by default so that you don’t have to set anything. Of course, you can change the settings according to your preferences, but you don’t have to, as it is ready to use once you install and activate it. You only have to do one action – click “Start Bulk Optimization”. This will compress all images, currently hosted on your site, to WebP format. The gray circle will inform you about the WebP conversion process:
Conversion to WebP in the making:
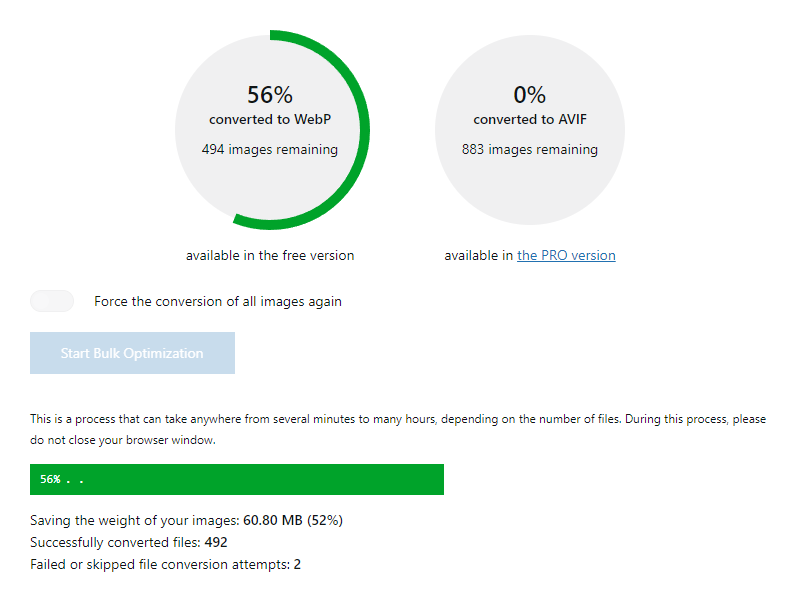
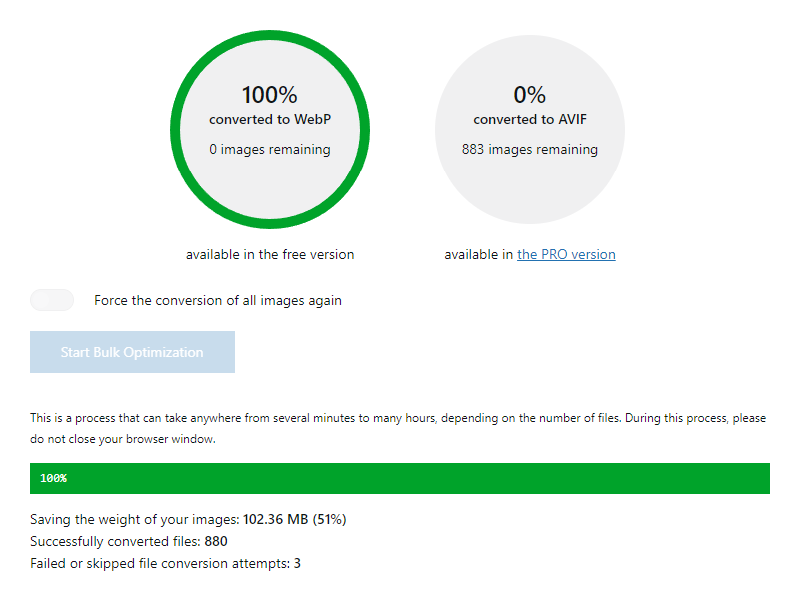
And after a few minutes, it ‘s done!
Summary
To sum up, the whole process took me literally just a few minutes – and I mean the time from installation, to activation and finally to WebP batch convert.
Now all images on my site are compressed to WebP, my site loads faster, users don’t have to be impatient anymore and I’m relieved because the abandonment rate on my site decreases.
We are the creators of this plugin, so it stands to reason that we will bring it up. However, we are pleased to hear reviews from its users and our customers. Are you using it? Do you like it? Or do you not?